
ORIGINAL DRAFT
There are times when you want to make it possible for users to make a quick selection from a range of values while still conserving real estate. Value ranges can be handled by scroll bars, sliders and even spinner controls, but each alone has some drawbacks. The scroll bar and slider controls consume more space and the spinner control is rather slow over an extended range of values. We’ll put together a popup solution that lets you make a quick selection in a simple click-slide-release motion, thus getting all the benefits of a JSlider while minimizing space requirements.
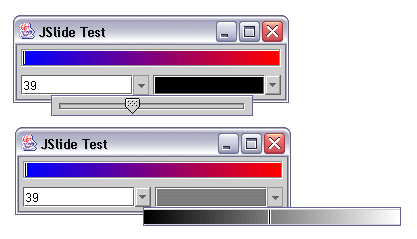
Figure 1: JSlide with a couple of different types of slider controls and associated editors/views.
Figure 1 shows a couple JSlide controls in action. The top example shows the default configuration in the left pull down area. This version uses a JSlider control in a popup position and an edit field in the editor position. With this control, you can quickly slide to the position you want by pressing the arrow button and moving the mouse horizontally to the position you want, releasing the mouse when your selection is complete. The key to this component is the fluid motion you can use to make a fast adjustment, without the burden of a continuously visible slider component.
The second example demonstrates the use of a more customized solution for a range of colors. In order to maximize flexibility we rely on interfaces for which new implementations can be provided. In this example, we use a GradientSlide control in the popup position and a custom view to show a color rather than a number in the field. From a usage point of view, it’s as straight forward to use a JSlide control and it is to use a JComboBox, and intuitively familiar to end users. In both examples, a GradientSlide control is in the top part of the window, demonstrating that it can also be used outside the JSlide context.
Like a JSlider control, each JSlide is based on a BoundedRangeModel. In fact, we’ll be sharing the BoundedRangeModel between the field part of the view and the popup, so let’s define an interface called BoundedRangeView that captures this contract between JSlide and these components. This approach allows us to change these views at anytime we want to present the information in a different way.
public interface BoundedRangeView
{
  public BoundedRangeModel getModel();
  public void setModel(BoundedRangeModel model);
  public JComponent getComponent();
}
We expect a view to provide access to the BoundedRangeModel so that we can get or set the model. Because we expect to use a BoundedRangeView as a component, we specify the getComponent method. This is primarily to avoid having to cast a JComponent that exposes the BoundedRangeView interface. Normally, this method will return a reference to itself. By exposing this interface, however, we guarantee that a component can be referenced without forcing the implementation to be a JComponent instance, even though that’ll typically be the case.
The trick with JSlide is to capture the mouse movement after a button click. Normally, the mouse control is released, the popup view is presented and you need to click again to move the JSlider position. This is more tricky a proposition than might at first appear to be the case. Rerouting mouse events to another component, translating coordinates and avoiding unexpected component states is problematic at best. My solution, after some number of fruitless attempts, was to track the mouse position relative to the button and to make changes to the JSlider model directly rather than trying to work through events. This turns our to be considerably more effective and relatively seamless in practice.
Let’s step through the architecture for this implementation and take a closer look at some of the classes. As always, you can find them all online at www.javapro.com. Figure 1 shows the relationship between classes. Effectively the main component, JSlide, uses two implementations of the BoundedRangeView interface. One for the field part of the view and the other for the JSlider or equivalent functionality in the drop down.
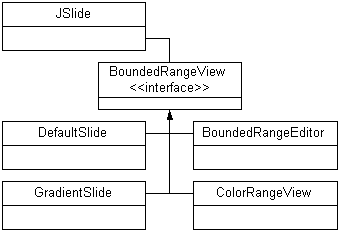
Figure 2: JSlide class hierarchy. Most of the classes implement the BoundedRangeView interface.
The DefaultSlide class is merely a subclass of JSlider that implements the BoundedRangeView interface. Since getModel and setModel are already part of JSlider, we add a getComponent method to retrieve the current instance and provide all the normal constructors. DefaultSlide will be placed in the popup window with the BoundedRangeEditor in the field area by default. The BoundedRangeEditor is a JTextField that also implements the BoundedRangeView interface. It also implements the ChangeListener interface to watch for changes to the BoundedRangeModel so that the values can be directly reflected in the field.
To demonstrate JSlide’s flexibility, I decided to implement a simple control that lets you pick from a gradient. GradientSlide implements that functionality and the ColorRangeView provides a complimentary field view that shows the color. We’ll skip the ColorRangeView implementation. It’s effectively a JLabel which, like the BoundedRangeEditor, implements the ChangeListener interface and registers to watch for BoundedRangeModel changes, reflecting those changes directly in the JLabel by changing the background color and repainting the display.
You’ll notice that DefaultSlide doesn’t need to implement the ChangeListener interface because it inherits it directly from the superclass, JSlider. GradientSlide mimics the same behavior more directly. We’ll make arrangements to have the slide position in the model as closely aligned with the current button position as possible when it gets popped up. Let’s walk through the GradientSlide and the JSlide components to clarify how they operate.
GradientSlide (Listing 1) can be used as an independent component with very similar characteristics to the Swing JSlider control, although GradientSlide is clearly more specialized. We’ll also make a few convenient assumptions about the dimensions of a GradientSlide control. First, since a gradient will involve colors interpolated between 0 and 255 for each color component, we can assume that the display area is always 256 pixels wide, accounting for a few additional pixels if a border is used.
We first declare a few instance variables to keep the model and gradient references readily available. Because we know in advance how big the component will be, we can create the GradientPaint object in the constructor, which we also use to set a default model with an appropriate range, set the border to the same default border as a JSlider, and add a mouse listener to respond to user activity.
We override the setModel method and make sure any previously registered ChangeListener is removed and a reference is added to the new model. The getModel method is trivial, returning a suitable reference to the current BoundedRangeModel. The setBorder method is slightly more interesting in that it makes adjustments to the preferred size of the component to reflect our preferred 256 pixel width, adjusted for the new border instance.
The paintComponent method draws the gradient view, along with vertical bars that reflect the current selection. You’ll notice that we use both white and black bars to ensure visibility. If the current gradient position is very dark (possibly black) a black line becomes invisible. The same holds true of white lines on a light (possibly white) background. By drawing two vertical black lines on either side of a white line, we maximize contrast and never end up with an invisible selection.
The rest of the code handles the MouseListener interface. We add a MouseMotionListener reference when the mouse is pressed and disconnect the listener when the mouse is released. Changes are tracked using the mouseDragged method if the mouse is moved while the mouse is held. We set the current model value both when the mouse is pressed and when it’s dragged, so a user can use either form of selection.
Now, let’s look at JSlide, which is the component we’re primarily interested in. We keep references to a few instance variables, including a BasicArrowButton which is part of the javax.swing.plaf.basic package. Ironically, this is a class that extends JButton, so it’s not clear why the Swing group didn’t give it equal status. We’ll also use an instance of JPopupMenu along with two BoundedRangeView implementations for the field and slider components. The slider instance will be the only entry in the JPopupMenu.
The third constructor is the one that does the real work. For convenience, I’ve provided one that uses the BoundedRangeEditor and DefaultSlide as the default field and slider, respectively. The second constructor uses the BoundedRangeEditor but lets you use any slider you want. The third constructor lets you define both components, so long as they implement the BoundedRangeView interface.
We use a BorderLayout with the field in the CENTER and drop-down arrow button in the EAST position. We explicitly set the preferred size of the pulldown button to 16 by 16 pixels to avoid esthetic surprises, and add ourselves as an ActionListener to listen to button events. The last two calls add the slider component to the JPopupMenu and share the model with the field BoundedRangeView.
To keep the code readable, I’ve implemented the menu popup code as a separate method. The popup method calculates where the popup method should be displayed, directly below the arrow button, positioned so the current model selection is right under the center of the arrow button. After all the basic math, we call the JPopupMenu show method to actually display the menu.
Because we’ll be using the relative mouse position to calculate the model value, I’ve provided a separate adjust method as well. The adjust method calculates the model value based on the model bounds and current value and adjusts the model to reflect the closest approximation based on the current x value, relative to the arrow button position. If you use the default JSlider instance in DefaultSlide, the mouse lines up almost exactly. If you were to use a larger component, the mouse would track faster relative to the size of the component. In either case, the movement is fluid enough not to confuse a user and very easy to work with.
Like the GradientSlide component, we add a MouseMotionListener reference when the mouse is pressed and remove it when the mouse is released. When the mouse is pressed, we keep a Point instance to mark the center of the arrow button position and call the popup method to show the menu with our slider component. When the mouse is moved, the mouseDragged method is called and we get a relative position for the mouse, based on the anchor position, and call the adjust method to update the model. Since JSlider and our GradientSlide change the view to reflect any changes to the model, the view is automatically updated as we move the mouse.
One of the real tricks in this component is a call to the clearSelectedPath method in the current MenuSelectionManager. This is the only way I know of to properly dismiss a JPopupMenu and is one of those very poorly documented magic incantations that make the difference between a well informed Swing developer and one who has to struggle to find a solution. In this case, you may never find it alone because it’s far from obvious and written about in very few places. Keep this one tucked away somewhere in your bag of tricks. It’s not easy to come by.
In concert, our components provide a great vehicle for presenting users with easy to navigate range selections that provide good visual feedback with a minimal footprint. Whether you think this approach is better than spin controls or always visible JSlider controls is subject to your own view of the world. Even I would contest that the JSlide component is not always friendly enough for novice users and may be annoying for it’s non-conformity. Still, it has its place and I hope you get something useful out of it’s implementation.
Listing 1
import java.awt.*;
import java.awt.event.*;
import javax.swing.*;
import javax.swing.event.*;
import javax.swing.border.*;

public class GradientSlide extends JPanel
  implements BoundedRangeView, ChangeListener,
    MouseListener, MouseMotionListener
{
  protected Paint gradient;
  protected BoundedRangeModel model;

  public GradientSlide(Color source, Color target)
  {
    gradient = new GradientPaint(0, 0, source, 255, 0, target);
    setModel(new DefaultBoundedRangeModel(0, 1, 0, 255));
    setBorder(UIManager.getBorder("Slider.border"));
    addMouseListener(this);
  }

  public void setModel(BoundedRangeModel model)
  {
    if (this.model != null)
    {
      this.model.removeChangeListener(this);
    }
    this.model = model;
    model.addChangeListener(this);
  }

  public BoundedRangeModel getModel()
  {
    return model;
  }

  public void setBorder(Border border)
  {
    super.setBorder(border);
    Insets insets = getInsets();
    int w = insets.left + insets.right + 256;
    int h = insets.top + insets.bottom + 14;
    setPreferredSize(new Dimension(w, h));
  }

  public void paintComponent(Graphics gc)
  {
    Insets insets = getInsets();
    int x = insets.left;
    int y = insets.top;
    int w = getSize().width;
    int h = getSize().height;
    w -= insets.left + insets.right;
    h -= insets.top + insets.bottom;
    Graphics2D g = (Graphics2D)gc;
    g.setPaint(gradient);
    g.fillRect(x, y, w, h);
    int p = x + model.getValue();
    g.setColor(Color.black);
    g.drawLine(p, y, p, h);
    g.setColor(Color.white);
    g.drawLine(p - 1, y, p - 1, h);
    g.drawLine(p + 1, y, p + 1, h);
  }

  public void stateChanged(ChangeEvent event)
  {
    repaint();
  }

  public void mouseClicked(MouseEvent event) {}
  public void mouseEntered(MouseEvent event) {}
  public void mouseExited(MouseEvent event) {}
  public void mouseMoved(MouseEvent event) {}

  public void mousePressed(MouseEvent event)
  {
    addMouseMotionListener(this);
    model.setValue(event.getX());
  }

  public void mouseReleased(MouseEvent event)
  {
    removeMouseMotionListener(this);
  }

  public void mouseDragged(MouseEvent event)
  {
    model.setValue(event.getX());
  }

  public JComponent getComponent()
  {
    return this;
  }
}
Listing 2
import java.awt.*;
import java.awt.event.*;
import javax.swing.*;
import javax.swing.plaf.basic.BasicArrowButton;

public class JSlide extends JPanel
  implements MouseListener, MouseMotionListener
{
  protected BoundedRangeView field;
  protected BoundedRangeView slider;
  protected JButton button =
    new BasicArrowButton(BasicArrowButton.SOUTH);
  protected JPopupMenu popup = new JPopupMenu();
  protected Point anchor;
  protected int offset;

  public JSlide()
  {
    this(new BoundedRangeEditor(), new DefaultSlide());
  }

  public JSlide(BoundedRangeView slider)
  {
    this(new BoundedRangeEditor(), slider);
  }

  public JSlide(BoundedRangeView field, BoundedRangeView slider)
  {
    this.field = field;
    this.slider = slider;
    setLayout(new BorderLayout());
    add(BorderLayout.CENTER, field.getComponent());
    add(BorderLayout.EAST, button);
    button.setPreferredSize(new Dimension(16, 16));
    button.addMouseListener(this);
    popup.add(slider.getComponent());
    field.setModel(slider.getModel());
  }

  protected void popup()
  {
    BoundedRangeModel model = slider.getModel();
    double min = model.getMinimum();
    double max = model.getMaximum();
    double val = model.getValue();
    double pos = (val - min) / (max - min);
    double width = slider.getComponent().getPreferredSize().width;
    offset = (int)(pos * width) - (button.getSize().width / 2);
    popup.show(button, -offset, button.getSize().height);
  }

  protected void adjust(int x)
  {
    BoundedRangeModel model = slider.getModel();
    double min = model.getMinimum();
    double max = model.getMaximum();
    double val = model.getValue();
    double width = slider.getComponent().getPreferredSize().width;
    double pos = min + ((double)x / width) * (max - min);
    model.setValue((int)pos);
  }

  public void mousePressed(MouseEvent event)
  {
    int x = button.getSize().width / 2;
    int y = button.getSize().height / 2;
    anchor = new Point(x, y);
    button.addMouseMotionListener(this);
    popup();
  }

  public void mouseReleased(MouseEvent event)
  {
    button.removeMouseMotionListener(this);
    MenuSelectionManager.defaultManager().clearSelectedPath();
  }

  public void mouseDragged(MouseEvent event)
  {
    int x = offset + event.getPoint().x - anchor.x;
    adjust(x);
  }

  public void mouseClicked(MouseEvent event) {}
  public void mouseEntered(MouseEvent event) {}
  public void mouseExited(MouseEvent event) {}
  public void mouseMoved(MouseEvent event) {}
}